Post by garrisonchisholm on Oct 21, 2018 21:16:41 GMT -6
Good evening all. I thought I would show a bit what a radar-fire environment will look like, with the blessings of Sir William (10 cents for the Monty Python reference).
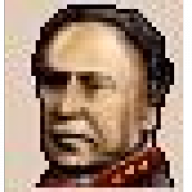
Below I had an action with Russian forces in July of 1949 in the North Sea near the western edge of the Bight. The below image I captured once my opponents deployments finally became visible- or so I thought.
Visible through the rain on our scopes is the Russian main body with scouting forces close aboard. I say close, though since the ships are tinged green instead of black that means they are only visible on radar. Unfortunately I am not sure what the precise range was; I will take more complete notes in my next play-through.
My battle line are two super-battleships with a battle cruiser escorting the CVs. The CVs are attached to the battle line in mid-30's British style. Unfortunately, operating my carriers separately (as a "scouting" unit) is a technology step that I did not yet have access to. Doubly unfortunately, if you'll notice the weather gauge it will be clear that today the carriers are not only useless but complete liabilities, essentially just a bag of points for the AI. However, there was nothing I could do about them but hope that their "transport" AI script would help them steer clear of danger. My extant scouting squadron is a lone BC of 28,000 tons (over 20 years old), with a second BC of the same type that had started the action Independent in the Battle Group which I have instructed to follow Bismarck and Bayern.
Though we cannot identify our targets with only radar, the AI knows that they are hostiles and engages when it has enough data to have a solution. There are multiple levels of radar fire control, each advancement appropriately named and adding either duration or detail. Here hits are being obtained by both ships in low visibility and high seas, aided by the proximity and low maneuverability of the target (which believe it or not turned out to be a light carrier conversion). The situation soon changed however.
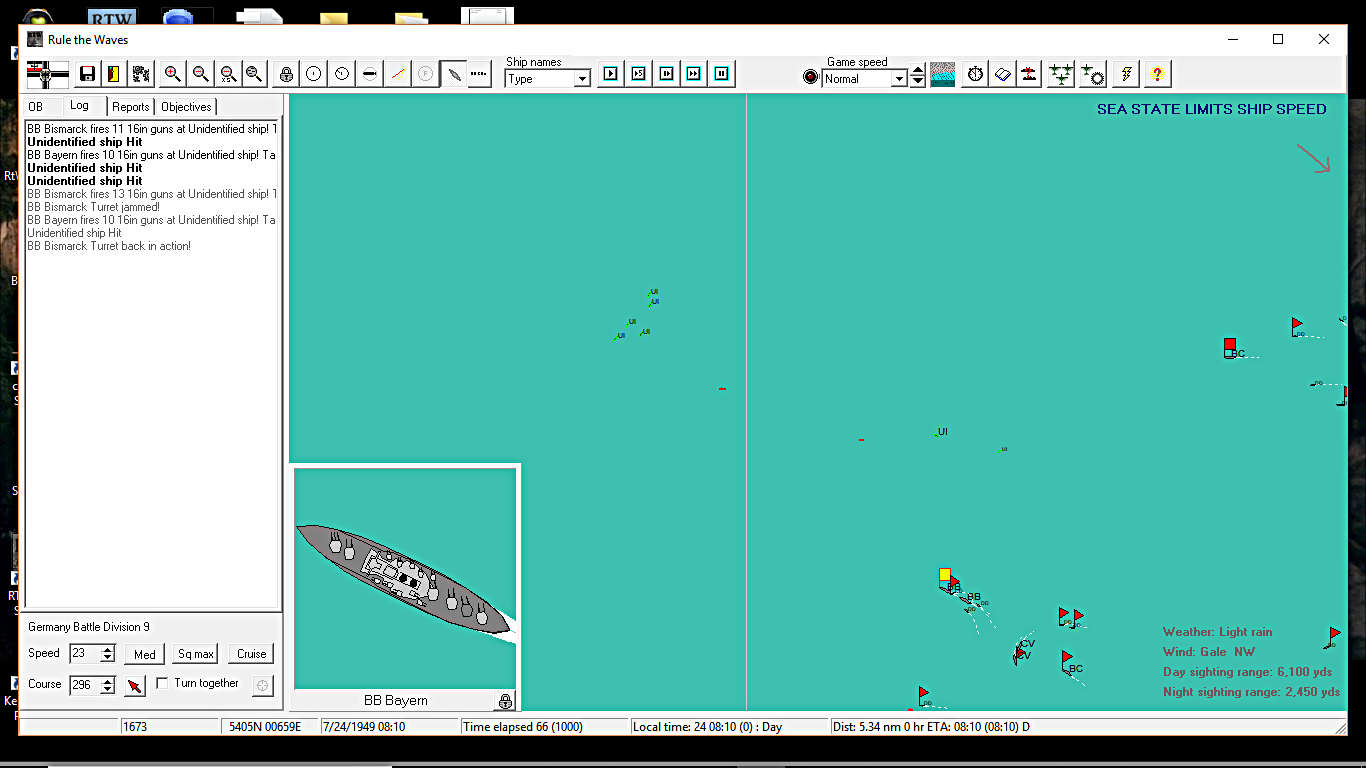
25 minutes later the rain lifted, and coincidentally additional ships appeared on our scopes .
It appears there were 2 enemy forces at sea after all. On radar there was no way to know what they were, so I had to treat them as dangerous. The Battle Group was in an exposed position, and if two forces broke through the mist to catch me in enfilade their targeting at such short ranges would be accurate and penetrating, plus I had to consider I was dragging along the carriers. I ordered a hard turn east, and for the rest of the day used my radar advantage to peck away at their fleet.
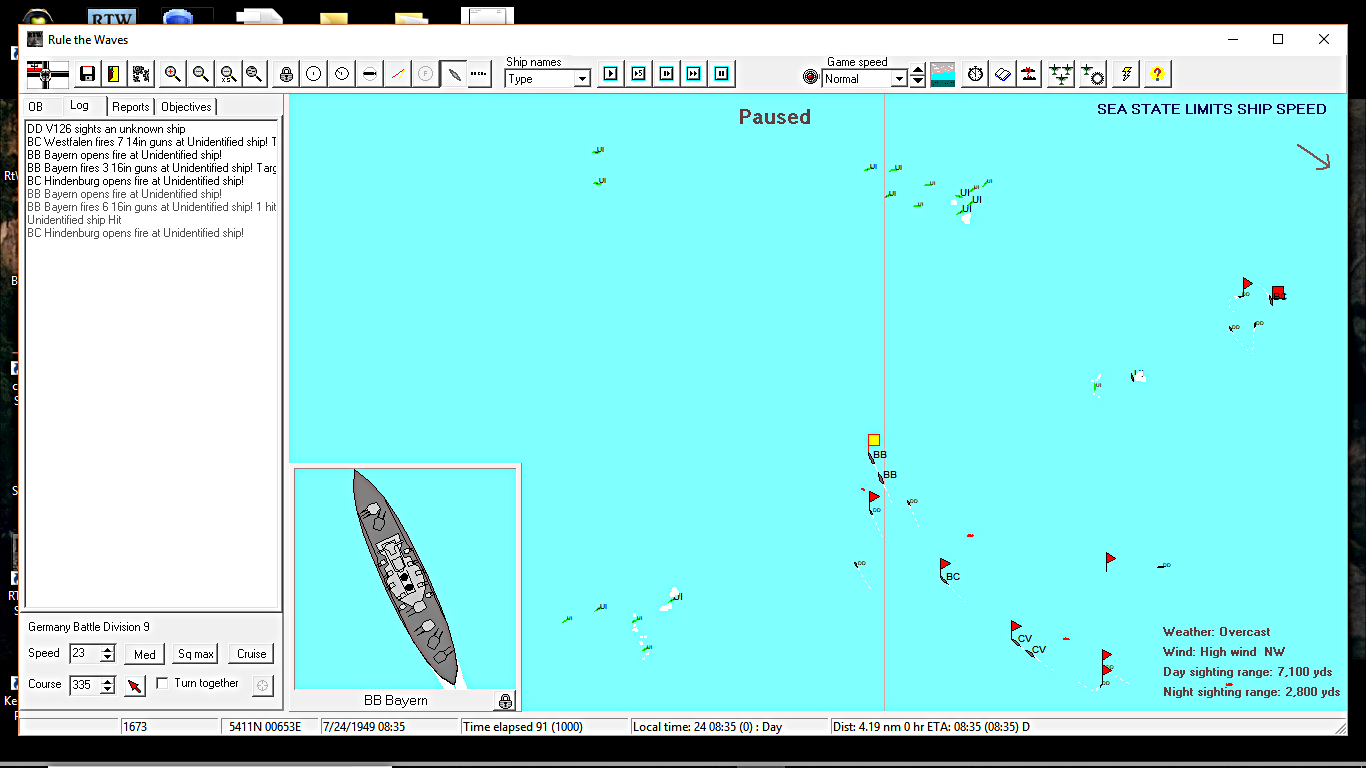
10 hours later the Battle Group, reduced to 16 knots by early battle damage, caught the stragglers against the Denmark coast, the weather having lowered again. I unfortunately snapped this and instant too soon, and then neglected to repeat it, as Bayern's first volley found the Y turret of the limping Russian battleship and it exploded.
I then broke off the action as their escorting destroyers got quite miffed and managed to sink a couple torpedoes into Bismarck and Hindenburg.
Throughout this encounter, the Russian fleet appeared to be only firing at my gun-flashes, for they only scored hits when they had a visible line of sight on me. They did appear to be able to target their torpedoes by radar, or if not then they had acoustic torpedoes, for they were quite willing to fire these from beyond visible range and some of them hit. It was a "Major" victory, though as I recall while sinking 2 of 5 capital ships and heavily damaging another, Bayern and Bismarck took a lot of punishment. The range of my radar fire never seemed to be greater then 20,000 yards, and most of the time I was maneuvering for about the 12,000 yard mark.
By the way, the 'red' dots in the first and second images are some rather intrepid flying boats out of Emden, which - surprise surprise - provided me Zero sighting reports in this day of terrible weather.
I will post future radar-guided insights into this thread, and I will try to answer any questions anyone might have. :]
Below I had an action with Russian forces in July of 1949 in the North Sea near the western edge of the Bight. The below image I captured once my opponents deployments finally became visible- or so I thought.

Visible through the rain on our scopes is the Russian main body with scouting forces close aboard. I say close, though since the ships are tinged green instead of black that means they are only visible on radar. Unfortunately I am not sure what the precise range was; I will take more complete notes in my next play-through.
My battle line are two super-battleships with a battle cruiser escorting the CVs. The CVs are attached to the battle line in mid-30's British style. Unfortunately, operating my carriers separately (as a "scouting" unit) is a technology step that I did not yet have access to. Doubly unfortunately, if you'll notice the weather gauge it will be clear that today the carriers are not only useless but complete liabilities, essentially just a bag of points for the AI. However, there was nothing I could do about them but hope that their "transport" AI script would help them steer clear of danger. My extant scouting squadron is a lone BC of 28,000 tons (over 20 years old), with a second BC of the same type that had started the action Independent in the Battle Group which I have instructed to follow Bismarck and Bayern.
Though we cannot identify our targets with only radar, the AI knows that they are hostiles and engages when it has enough data to have a solution. There are multiple levels of radar fire control, each advancement appropriately named and adding either duration or detail. Here hits are being obtained by both ships in low visibility and high seas, aided by the proximity and low maneuverability of the target (which believe it or not turned out to be a light carrier conversion). The situation soon changed however.
25 minutes later the rain lifted, and coincidentally additional ships appeared on our scopes .

It appears there were 2 enemy forces at sea after all. On radar there was no way to know what they were, so I had to treat them as dangerous. The Battle Group was in an exposed position, and if two forces broke through the mist to catch me in enfilade their targeting at such short ranges would be accurate and penetrating, plus I had to consider I was dragging along the carriers. I ordered a hard turn east, and for the rest of the day used my radar advantage to peck away at their fleet.
10 hours later the Battle Group, reduced to 16 knots by early battle damage, caught the stragglers against the Denmark coast, the weather having lowered again. I unfortunately snapped this and instant too soon, and then neglected to repeat it, as Bayern's first volley found the Y turret of the limping Russian battleship and it exploded.

I then broke off the action as their escorting destroyers got quite miffed and managed to sink a couple torpedoes into Bismarck and Hindenburg.
Throughout this encounter, the Russian fleet appeared to be only firing at my gun-flashes, for they only scored hits when they had a visible line of sight on me. They did appear to be able to target their torpedoes by radar, or if not then they had acoustic torpedoes, for they were quite willing to fire these from beyond visible range and some of them hit. It was a "Major" victory, though as I recall while sinking 2 of 5 capital ships and heavily damaging another, Bayern and Bismarck took a lot of punishment. The range of my radar fire never seemed to be greater then 20,000 yards, and most of the time I was maneuvering for about the 12,000 yard mark.
By the way, the 'red' dots in the first and second images are some rather intrepid flying boats out of Emden, which - surprise surprise - provided me Zero sighting reports in this day of terrible weather.
I will post future radar-guided insights into this thread, and I will try to answer any questions anyone might have. :]
_(edited)_Screenshot_(739).png?width=180&height=180&fit=bounds)


 . Looks tops to me