|
|
Post by admiral on Jul 5, 2016 14:06:22 GMT -6
Yeah, the moment you see a pre-dreadnought on fire then you know you've probably got them. Still, the Russian didn't catch on fire until the after range was down to about a thousand yards; even for 1904, isn't that basically knife-fighting range? I was expecting the Russian to start planting 12in shells into the cruiser's belt any second. Yep, that's knife-fighting range. 1-3k yards is pretty standard for early game engagements, and it can get unpredictable and brutal. I find that one of the best (and perhaps only) way to get sinkings in the early game is to just charge into sub-1k yard ranges to get the accuracy percentage to default to 10% and begin pounding. Watch out for torpedoes, though! As for why the Russian ship didn't really hit you, I chalk it up to RoF. At knife-fighting ranges, accuracy basically defaults to 10% since the base chance climbs into the 40s and 50s, meaning almost no amount of penalties can reduce it below 10%. In other words, I think it was because they couldn't fire, let alone hit you. In the beginning of the game, RoF is absolutely atrocious, especially for main batteries. I believe early game main battery RoF is somewhere in-between .3 and .4, which I believe means "shells per minute per gun". In other words, it's terrible already, and when you consider that structural damage reduces it further, it seems they simply weren't firing because all those close range 10' shots had wrecked their structure points. For reference, 100% structural damage carries a -50 penalty. I've had RoF drop down to .1 in no small part to structural damage. |
|
|
|
Post by genjeft on Aug 19, 2016 10:51:57 GMT -6
So this happened.  Convoy raid in the middle of the night. I am sending some old ACs, LCs, and destroyers to the Far East during a war with England. There is an escorting BC to help lend some firepower to these old ships. 3 old ACs, 7 old old OLD destroyers, 2 old LCs and 1 BC are involved in this fight. The ACs of course start on independent action (as is tradition) and are miles ahead of the BC when the convoy is found by the BC in the night. The BC spots two modern British BBs and a BC so I tell it to turn tail and run then tell the ACs to act as scouts for the BC so they dont start fighting on their own. Take a guess how well ordering the ACs to act as scouts went... Yea... The went full steam into the middle of the British fleet shooting up everything they passed by. Within minutes the Hood erupted into flames as that old AC fired 2 10 inch shells, scoring one single hit on the magazine. In the end the British lost the convoy and a BB with an assortment of other ships to my loss of a crappy legacy LC and a legacy destroyer. |
|
|
|
Post by axe99 on Aug 20, 2016 18:17:41 GMT -6
Poor old Hood, can't even get a break in a videogame! That's excellent work by the AC  . |
|
|
|
Post by joebob73 on Aug 20, 2016 19:44:33 GMT -6
Night battles are the best. Built a pair of torpedo cruisers with 4x quad launchers per side, and 5/6 of the underwater tube locations. Got them as part of my force in a night engagement with an entire enemy fleet, visibility was approximately 1000 yards. 8 kills between the two cruisers, 5 of which were BB/BC. Torpedoes are so hilariously overpowered in captain's mode, because even with TDS level 4, you aren't likely to survive a full spread of 4 simultaneous torpedoes.
|
|
|
|
Post by theotherguy3 on Aug 22, 2016 2:40:43 GMT -6
Tell me about it, mate! 1906, Germany, large fleet, historical resources. I have just built a wonderful set of three dreadnoughts and have scrapped the pre-dreds because, you know. War against France, I raid into the Channel, hit them hard. Night falls and I contentedly steam off eastwards. Some hours later, it is pitch-black, my fleet spots a line of three unidentified ships, about 1km away dead ahead, heading directly for my BB-line. Within three minutes from that sighting all my BBs are torpedoed at least twice. None make it home. Even though my fleet was trained in gunnery and night fighting, the destroyers were never even identified as enemies.
The only thing left to me was a mis-shapen BC. I always try to have an early BC, because they are just terrifying if your enemies only have CAs and older Bs, and BBs can´t touch them. But this one was designed greedily, before the technology was right. So poor little underarmed and somewhat slow SMS Moltke now had to carry the whole war effort. The German Navy came back, thanks to the excellent Pommern-class, but it never aspired to greatness again. Despite later victories against France, Russia and Japan, the Kaiser died a bitter man, knowing that he would have gotten away with his Weltpolitik, if it hadn´t been for those pesky French destroyers and their bloody torpedoes.
THE END
|
|
|
|
Post by bcoopactual on Aug 22, 2016 7:21:02 GMT -6
Tell me about it, mate! 1906, Germany, large fleet, historical resources. I have just built a wonderful set of three dreadnoughts and have scrapped the pre-dreds because, you know. War against France, I raid into the Channel, hit them hard. Night falls and I contentedly steam off eastwards. Some hours later, it is pitch-black, my fleet spots a line of three unidentified ships, about 1km away dead ahead, heading directly for my BB-line. Within three minutes from that sighting all my BBs are torpedoed at least twice. None make it home. Even though my fleet was trained in gunnery and night fighting, the destroyers were never even identified as enemies. The only thing left to me was a mis-shapen BC. I always try to have an early BC, because they are just terrifying if your enemies only have CAs and older Bs, and BBs can´t touch them. But this one was designed greedily, before the technology was right. So poor little underarmed and somewhat slow SMS Moltke now had to carry the whole war effort. The German Navy came back, thanks to the excellent Pommern-class, but it never aspired to greatness again. Despite later victories against France, Russia and Japan, the Kaiser died a bitter man, knowing that he would have gotten away with his Weltpolitik, if it hadn´t been for those pesky French destroyers and their bloody torpedoes. THE END Nice. If you feel like it, I'd be interested to see the Pommern, Moltke and/or your 1906 dreadnought designs posted in the best ship design thread. nws-online.proboards.com/thread/354/post-best-ship-designsI always like to see designs that people have had success with. |
|
|
|
Post by thatzenoguy on Sept 4, 2016 0:36:11 GMT -6
 Foolish mortals! Soon we will be at war with the WORLD! AND WE WILL WIN! BWAHAHAHA! |
|
|
|
Post by Bullethead on Sept 4, 2016 1:09:12 GMT -6
In my current game as the US, I'm at war with the UK in 1901-1903. The absence of the Panama Canal has led to half the US fleet repeatedly going back and forth around Cape Horn without ever managing to be in the right place at the right time. One of these wrong times led to a short blockade of the US East Coast, and a fleet action came up, 3 US BBs against 8 UK. It was a hectic fight (I play on Admiral level so most of my fleet does its own thing) but my little fleet managed to shoot its way out from between incoming Brit pincers, pin a Brit AC against the shore near Cape Lookout, sink her, and escape back to Charleston with only minor damage. A CL detached to pick up the Brit survivors had a very close call with the Brit scouting forces returning to the fray, but still managed to escape unscathed. It was a very tense engagement. 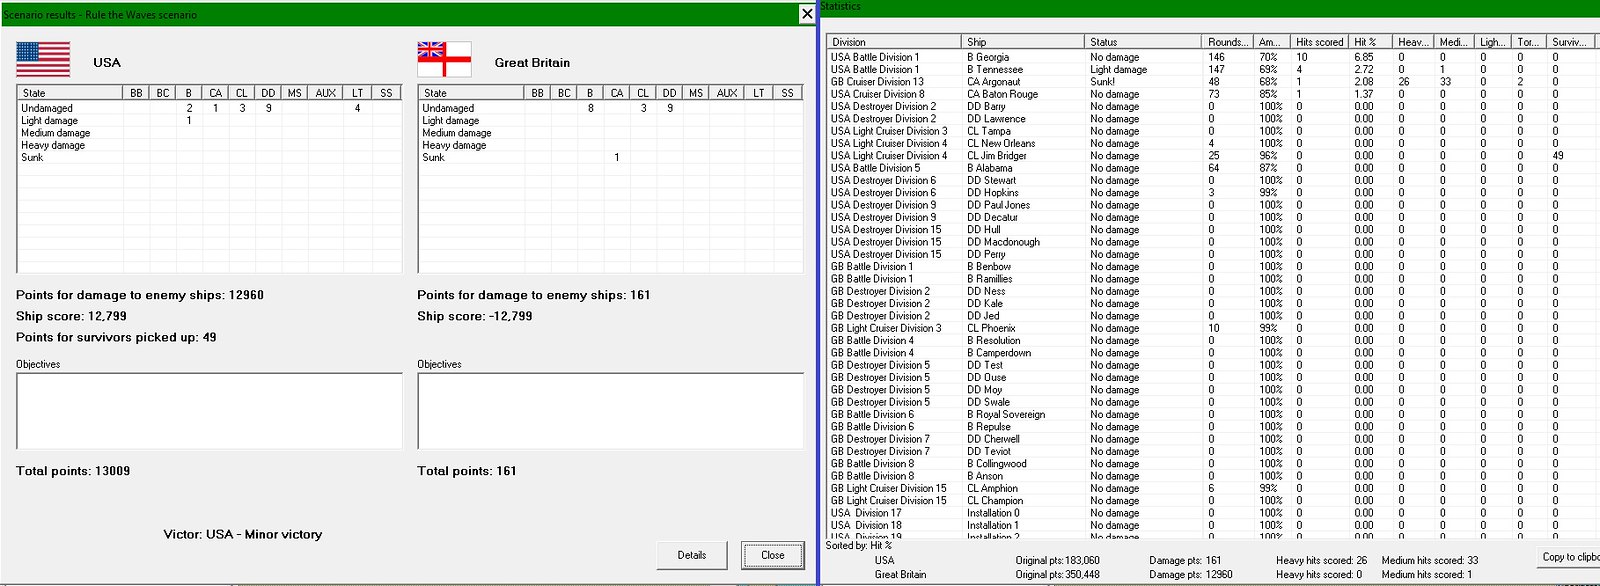 |
|
|
|
Post by bcoopactual on Jan 13, 2017 9:42:59 GMT -6
Hopefully people won't mind if I resurrect this thread instead of starting a new one but I just had an interesting, if inconclusive, battle that I thought I'd share the write-up for. [Note - The first true Dreadnought ship in this game was HMS Goliath so you will see the name Goliath used where you would normally see Dreadnought in the write-up] - Tough Little Rock Off Cape Cod - Feb 1917 In what Naval Intelligence originally believed was going to be a cruiser duel, the battlecruiser USS Concord with light cruisers USS Little Rock and USS Albany acting as scouts and screened by destroyers USS Aylwin, USS Benham and USS Fanning instead encountered the German Goliath type battleship SMS Oldenburg twenty-five miles east of Cape Cod, MA. Oldenburg immediately opened fire on the USN light cruisers having the advantage of knowing that no other German ships were in the area and therefore was unhampered by the risk of fratricide. On her first salvo, at 15,000 yards, she struck Little Rock’s engine room with a high explosive shell that knocked out her main engines and left her dead in the water. Concord and her destroyer screen raced North at full speed to draw the German’s attention from the crippled cruiser. Fortunately, as the German closed the range, Oldenburg’s guns were only able to strike Little Rock one more time, a 14 inch shot that penetrated her bow forward of the main armor belt and one additional 14 inch near miss close enough to cause some minor damage. Little Rock’s guns were not idle during this period managing two hits with her main guns, one it was later learned damaged Oldenburg’s rudder temporarily and the other knocked out one of the German’s two fire control Directors. It’s possible that the distraction of repairing the rudder and switching to the alternate fire control Director is what spared the light cruiser from a watery grave that day. Although Little Rock was effectively out of the fight, the battle would leave her behind as her crew struggled to get her machinery working, she was never in any danger of sinking and she earned her new nickname of Tough Little Rock by bloodying the nose of the 30,000 ton German Goliath and surviving to fight another day. Concord and her destroyer screen managed to draw Oldenburg’s fire away from Little Rock and a running battle to the east commenced with torpedo runs from the American destroyers. None of the torpedoes hit and destroyers Fanning and Benham were damaged by hits from Oldenburg’s 4 inch secondaries. During the fight, Concord, which was 7,600 tons lighter and armed with eight 12 inch guns vs. the ten 14 inch guns of the German Goliath, used her superior speed to maintain the distance towards the extreme of her main gun’s effective range. One hit from Oldenburg destroyed her primary fire control Director and another struck the top of No. 3 Turret but did no damage. A third hit struck the main belt protecting the engine rooms and did not penetrate. In return, Concord struck the German with three 12 inch shells, one of which destroyed several secondary guns on Oldenburg’s starboard side, the other two struck her main belt and failed to penetrate. The battle ended when Concord exhausted her armor piercing ammunition and used her superior speed to retire back to the west. The overall battle was considered a minor American victory and the heroism and escape of Little Rock and her crew was celebrated nationwide.    |
|
|
|
Post by bcoopactual on Jan 13, 2017 10:57:19 GMT -6
Here is USS Concord for comparison. She is built in the historical German style of sacrificing firepower instead of armor to attain greater speed. She actually doesn't match up too poorly against SMS Oldenburg considering her size difference. 12 inch (+1) guns, a very expensive refit which I decided to try experimentally, are reasonably comparable to 14 inch (-1) guns which is what Oldenburg carries.   |
|
|
|
Post by axe99 on Jan 13, 2017 15:17:10 GMT -6
Great write-up, that's a tough little CL . |
|
|
|
Post by bcoopactual on Jan 13, 2017 18:27:56 GMT -6
Thank you. They say sometimes it's better to be lucky than good. Two hits, two criticals is pretty lucky. You can also tell the difference that damage control techs make. She's not an all-or-nothing design so I would have expected more flooding from that 14 inch shell fore/aft hull hit but I just reached DC tech level 9 a few turns ago.
|
|
|
|
Post by beastro on Jan 20, 2017 1:30:15 GMT -6
One thing I love is to charge into the enemy line before torpedoes are effect, cutting off the van or rear and then encircling it. Reminds me of how predatory marine animals pick apart a school of fish. I've done that several times in several games against the US and effectively sank their entire battleline in one battle with both notable battles in different games resulting in four sunken BBs and 9-10 sunken Bs.
Another is in a fairly simple, set piece area like the Otranto Straits, crossing the T and retreating while snaking back and forth as the AI charges. I did that outnumbered 1:2 as AH against Britain, sank a couple BBs and wounded a bunch of others. I then brought them into port badly wounded while my independent BC squadron went out and picked off the slowed stragglers taking out 3-4 more with only a pair of BCs.
It made me really wish the AI would focus one maintaining a unified speed and struggle to save crippled survivors, doing so as the player is some of the most fun and rewarding fighting I have in this game.
My early massively loved moment is when you feel the right moment to send your DDs in, especially when the AI is coming at you, but is bunched up, attacking in a V and crisscrossing them with torpedoes. Even if they manage to survive they are so disorganized and their own DDs so busy with yours that you can charge in and pick off isolated pickets, but it's still extremely risky as so much is going on that one or two enemy DDs have wreck havoc. It's moment like that that max TD comes in handy. What's hilarious is doing that at or near nighttime. The battle results in mutual chaos with ships scattered all over the place fighting it out as your commanded squadron rushes around desperately trying to regain manual control of whatever ships it can and reform. I did that once as Germany against Italy off Sardinia with my oldest BBs and my remaining Bs. I lost half my battleline but completely decimated their fleet, which combined with another victory against France allowed me to dispatch some of my oldest front line BBs to reinforce the Med and prevent me from having to withdraw from it completely.
Another one I like is when you have little to no DDs, a handful of CLs and a outgunned battleline. It lulls the AI into being overconfident and charges in ignoring your CLs. Typically the AI is cautious of torpedo attacks, but barreling in it becomes both disjointed and ignores the lighter ships as it tries to get as close to the battleline as it can, allowing you to have it walk right into a torpedo spread.
In two battles with the US and Japan against me, Spain, I had one battle where two of my overarmoured ACs went up against 1 11inch BB (MY ACs had 12 inches of armour), 4Bs, a AC, two Cls and a smattering of DDs. I kept withdrawing the ACs as I snaked the CLs back and forth making smoke until they launched torps and stopped the BB dead in the water. After that I swung my ACs around and encircled the Bs as my CLs got close and torped one before finally charging the ACs in to cut off the two from retreating into port and stopping them dead in the water allowing only one B to escape. Was funny too because as I withdrew with one AC badly torped from their mad charge the DD that torped it kept shadowing me until night all by itself. I could just imagine the Bushido obsessed CO of it refusing to withdraw and wanting at least one kill after the debacle that had happened.
The other battle in that campaign. Was in the mid-1910s, had my 8 Bs and three CLs trying to mop up American SEA going up against a BB, 2 BCs, a B and a few light support units they'd built and sent off to relieve the Philippines. The AI knew it's range advantage and pressed it crippling and slowing half of my Bs with their 2-2.5 inch deck armour. The worst of the lot was the lead BC, it was a massive 39,000 ton, 12 14in gun armed monster that was single-handedly taking my Bs on by itself and winning until dusk hit. My CLs were doing their usualy snaking smoke laying when the BC charged right at them getting a three torps fired at it from two CLs. it avoided two torps only to run into the third and sank immediately. Just as suddenly the battle shifted and I charge back at the remaining US units, which turned and fled for Manila. With pretty much every unit badly mauled I limped after them and took out the B and last remaining BC as the BB used it's unmauled state to make it into port safety. For the price of all of that I lost only 2 Bs.
These last two battles really showed me how powerful 8000 ton, 7 and 8 inch armed CLs with 1-1.5 inch armour are. They trade their mass soaking up damage for armour and their larger guns allow them to lead the chase and slow large ships down enough for the battleline to catch up and sink them in the absence of a heavy enemy scouting force.
Edit: Another hilarious battle scene is Cape Co against the US regardless of the circumstances. You can push them to fall back and hit Cape Cod, which given it's shape, splits the AIs forces while they struggle to round both sides allowing you to devastate them as they're pressed up right against the shroeline. Every time I happens I have a mental imagine that's a combination of Port Arthurs wrecks mixed with USS Memphis and Milwaukee strewn along the shore for all of New England to come see and despair at.
|
|
|
|
Post by joebob73 on Jan 21, 2017 3:58:11 GMT -6
So I got into a fight with Britain in 1927 as the USA. I promptly send my entire battle fleet to the Caribbean, where the British have sent their main fleet. First battle that pops is a battleship engagement, maximum size. I accept, and am greeted with a shocking force arrangement. 1 ancient BC I now use as a raider, 6 CAs of similar vintage, and 2 CLs from the same time frame. Supporting them is a division of 4 excellent modern destroyers, with 35 knot speed and no compromises on armament thanks to a lucky "Exceeds design speeds" event. So I assume that the British have a similarly weak fleet. WRONG. They got 1 BB, and 4 BCs, all newer than my heavy combatants. Aside from a single one of their BCs, they are all armed with 14" guns, between 8-10 per ship. This other ship is armed with 10 16" guns. However, they only have a single escorting destroyer. But I don't yet know this. My CL squadron spots an enemy in the haze, at night, less than 3 kilometers away. I order all my ships to flank speed, and set them on course to converge at the sighting. When I hit the turn button, however, I am greeted with the message "CL Minneapolis is sinking". The "unidentified ship" turned out to be a massive 40k ton BC, and had sunk her on the first salvo. At this point, I realize that the enemy fleet has modern capital ships displacing about twice as much as my squadron's heaviest ship, and likely more than one of them. I order the fleet to head for port, and that's about when the rest of the enemy fleet appears. What the enemy doesn't realize is that they have actually put their ships in the one situation they could possibly lose in. I have several torpedo-armed destroyers, and my CAs, while ancient, have been upgraded with both advanced director fire control as well as modern 13" guns. My own battlecruiser runs headfirst into a British battlecruiser division and takes 14 heavy caliber hits, while only making 5 in response. This leaves it with about 400 flooding and only half flotation remaining. I order her to turn away from the new threat, while giving the DD squadron orders for a torpedo attack. Several torpedoes are fired, but only two hit, one of which bounces harmlessly off the hull of the battlecruiser without exploding. The other knocks out her engines, leaving her dead in the water. I order one of my 3-ship CA divisions into close range, hoping the 13" guns can take out this ship before she can get back underway. Meanwhile, my other CA division has run into a battleship. Several minutes of furious main battery fire later, both enemy capital ships are dead in the water, while I have only suffered medium damage to one of my cruisers. As her forward turret is destroyed, I detach her and send her to port. The CA division that had just sank a battleship then stumbles upon a third battlecruiser, and a short exchange of fire leaves one of my ships moderately damaged and the British battlecruiser sinking. As dawn finally approaches, I set course for the base, hoping that my battlecruiser will be able to repair enough of the flooding to make port. I then realize that more of my ships had taken hits than I noticed, and it's about then when a 4th BC pops up, this one with an escorting destroyer. But a fake torpedo run from my own destroyers, who have no remaining torpedoes, is enough to drive her off. Shortly thereafter, my fleet reaches port and the battle ends. It was one hell of a ride for those old cruisers, and probably the most tonnage sunk in a single engagement during this run.  This is the only screenshot I remembered to take during the battle. And here's the scorecard   |
|
|
|
Post by bcoopactual on Jan 21, 2017 9:45:23 GMT -6
Good story joebob73. Seems like the British can never get away from their battlecruisers being glass cannons. I know some of the AI ship templates are Nation specific but I wonder if anyone has ever seen the British AI build a German style BC (Reduced armament or caliber to get BC speed with no or minimal sacrifice in BB level armor)? |
|


 .
.


